
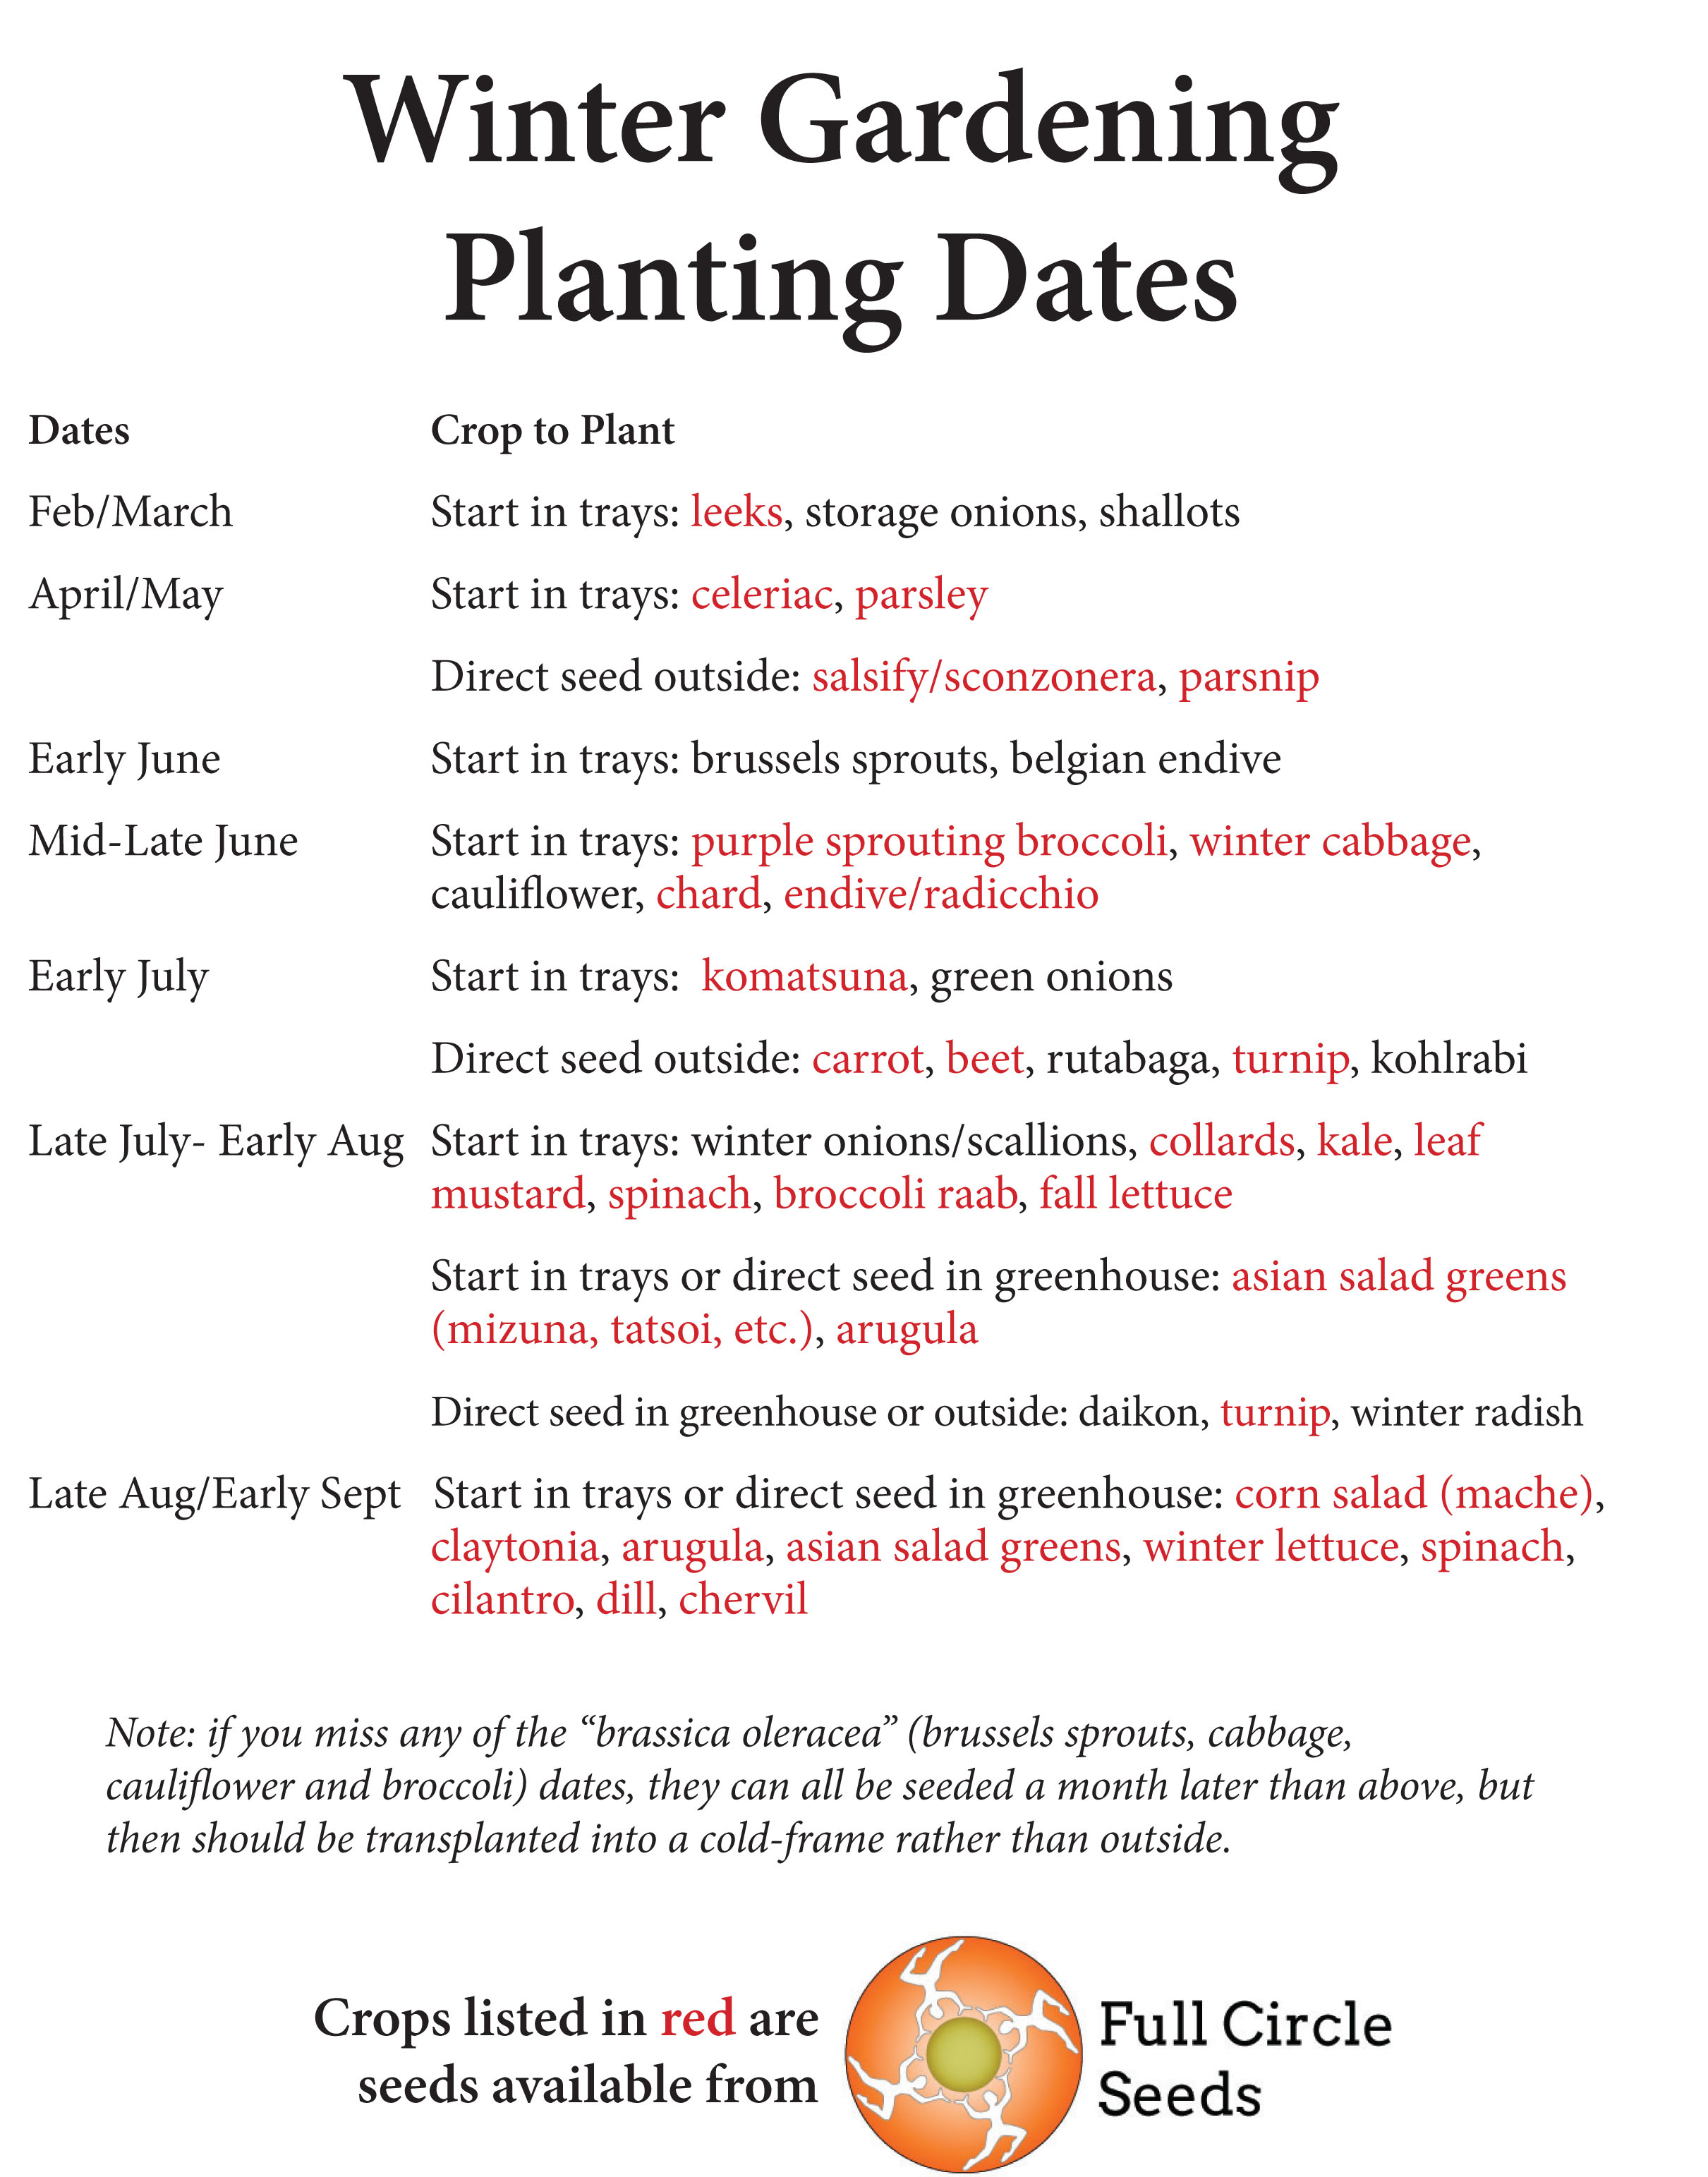
Winter Gardening Planting Dates
Mary Alice
Please use the form on the right to contact us by email. Thank you.
3680 Otter Point Road
Sooke British Columbia V9Z 1H8
Canada
250.642.3671 or 250.642.2131
ALM Organic Farm is a 15 acre organic farm located in Sooke on Vancouver Island in British Columbia. Certified organic since 1994 (IOPA#401), we believe that by growing organically we contribute to the health of the environment and of the people who eat our food.
ALM & Full Circle Seeds Farm Blog. Information about how to grow food & seed organically
Filtering by Category: How-to
Thinking about good displays at our local Sooke Farmers' Market and the Victoria Moss Street Market. Letting the customers see clearly what's available is important. Here is the difference Lindsey Snelling made by changing the position of her beets.


Ian King has a great farmer's table at Moss Street Market.

Teresa Wilman from Silver Cloud Farm puts together a great display. She bought herself a laminator which makes her signs look great.


Today Kit Warren sprayed our beds, chicken houses, and seedlings with EM, Effective Micro-organisms. To learn more you can check out more here. In return, I'll spend some time with Kit at his farm. Here are some photos of Kit and his sprayer:


After newly seeded tomatoes have germinated and got their true leaves, they should be transplanted into 4" pots which have richer soil. Here is a video of the process: Transplanting tomato seedlings
Here's a video of how we transplant tomatoes from 4" pots into the ground.

Carrots take a long time to germinate and can't take a heavy weed load. Therefore, we prepare a carrot bed about 1 or 2 weeks ahead of planting and then flame the bed with a tiger torch. Here is a video of Marika flaming a carrot bed to reduce weed load.flaming 2

After flaming carrot beds we plant radishes in between the rows. The radishes will be up and harvested before the carrots get too big.

We had a frost two days ago. I think it is the last so I put out my summer squash under floating row cover. I have been tracking first and last frost for my farm pretty methodically for the past 10 years. I keep a journal by my bedside and while I drink my morning coffee I write down the weather and main activities from the previous day. I try to zero in on first and last frost because they affect when to plant and harvest so dramatically. For my farm I can get a frost as late as May 7th, but the last frost can be as early as April 18th. The most often date or mean is May 1st. I can expect a first frost as early as September 22 or as late as November 8th but most likely around October 12th. Jess took these beautiful photos of the frost:


Yesterday we transplanted shallots, onions, and leeks into a 100' bed. We trimmed their roots and tops before transplanting and watered them in well.
![]()
Also I transplanted into pots summer squash that I got started in damp paper towels in plastic bags kept in a warm place in my house - on top of my stereo. I like to start them this way because it helps me plant only the strongest seeds that I know have already germinated. Also it's faster and takes less space. Our heat tables are soooo full right now with tomatoes and peppers waiting to get into the ground in the greenhouses.

Today we transplanted 44 good looking parsnips to grow out for seed. Parsnips are crossers, meaning they are pollinated by insects or wind, and we want to keep as much genetic diversity in the seeds as long as they are true to type. A selection of 44 good plants should provide that genetic diversity.

I'm really enjoying an organic gardening book I got from the library - The Organic Gardeners' Handbook by Frank Tozer. It is clear, well written, easy to read and comprehensive, especially good for a new gardener. I will add it to my list of favourites.


We moved our 20'x50' greenhouse today. It took about 45 minutes. We had to get a brace for the front and tie the back together with a rope, take off the bags of rocks we use to weigh it down so the wind won't blow it away, hook chains to the two side runners (3" angle iron), and the pull with the front end loader of the 21 horse power tractor. I wish I had video taped it. We'll do that this fall when we move it again for winter crops.

It was dry enough I could till the bed for onions and another for beets. I also Moved 55 yards of Sea Soil on the new property so we can transplant parsnips for seed and plant sweet corn later in early May.
The crew got ready to transplant in strawberries on Wednesday. They tilled in lots of compost, alfalfa, kelp, rock phosphate, gypsum and then top dressed with Sea Soil. We use a heavy 3' landscape fabric to cover the rows for weed control. We'll plant the 2' paths with white clover and keep it mowed with a small lawn mower.

Once seeds have germinated, their needs start to change. Once you have 80-100% germination, take the lids and/or row cover off to allow in more light. Giving the seedlings good access to light is the biggest challenge in the early spring. If your seedlings start to look “leggy” (tall and spindly) that is an indication that they need more light, as they are literally stretching up to get closer to the light source. If you are using natural light from a window and you notice they start to grow sideways towards the window, they would prefer more light. Supplementing the light in the early spring or giving them access to full & even daylight is preferable to produce strong, healthy transplants. Leggy plants have a weak stem and they are more susceptible to dampening off.

You don’t have to buy expensive bulbs to supplement the light, we use fluorescent lights (½ warm bulbs and ½cool bulbs) to help us get a good jump on the season. Getting the seedlings as close to the lights as possible is crucial, it’s amazing how much difference a couple centimetres seem to make. As the days grow longer supplementing the light becomes unnecessary, a plants tend to prefer real sunlight (and rain for that matter).
Once the seeds have all germinated, we start bottom watering as opposed to top watering. This helps us avoid dampening off and other problems associated with top watering. It also does a more thorough job of watering so you will have to water less often. Find containers big enough to hold the trays or pots that you are starting your seedlings in. Fill with enough water so that when you set the tray/pot inside, displacement will bring the water line up about ½ to ¾ up the side of the tray/pot. Make sure the water doesn’t come above the soil line or you are defeating the whole purpose. It takes about 10-30 minutes for the capillary action to suck the water up to the top (depending on the soil, size of pot, etc). Throughout the day at the farm we are continually taking trays in and out of the bottom watering containers. There is almost always something being bottom watered during the day, and every time I walk by the seedling area I put something new in to bottom water. Try not to leave plants in longer than an hour and don’t leave them bottom watering over night. The key is to stay ahead with your bottom-watering schedule. If it gets desperate and you have too many dry things in line to be bottom watered, you may need to top water to keep your plants alive.

Germination is an art. It is the most crucial step in the garden. A seed farm has the advantage of having many “volunteers” (self seeders) naturally show us when they choose to germinate, they mark the season and give clues to earliest planting possibilities for many different crops, in the cold frames and out in the field. At ALM farm, teaching our apprentices about germination is a crucial part of their education. It is a simple, basic skill that requires dedication, observation and daily nurturing. It is repetitive.
The first key to success is to give the seed constant moisture while it is germinating. Mist daily as necessary, creating a daily observation routine that works well for you and the seeds. I like to check in the morning before the heat of the day, and then again in the afternoon when it’s hot and dry conditions (germination in the summer is challenging). Use clear lids or row cover to help keep in moisture during germination. You don’t want it sopping swampy wet either; remember to keep the balance. Use a light mix to start your transplants; too rich of a mix will make the seed more susceptible to rot and fungal problems.
The second key is to know the temperature the seed requires to germinate. Most are happy at about 17 C. A heat mat is helpful to create the right conditions for optimum germination, especially early in the season. Seeds will not germinate if they are too cold or too hot. The earliest spring crops are vegetables that germinate in cooler soils; crops such as broad beans, peas, spinach and potatoes are the first crops to be planted outside. Early spring is a busy time for the heat table, things coming and going, some crops like lettuce spending 3-7 days there, just for germination then they are off the heat tables and being gradually hardened of until they are transplanted outside 3-6 weeks later and others like peppers who are babied all the way along, spending up to 4 months lounging about soaking up the heat off the heat tables to the last moment. Wait to plant beans and corn until the soil has warmed up (May-June) or they will not germinate and instead rot in the cool soil. In the summer, use a shady area to get summer lettuces to germinate, as they don’t germinate well out in the full heat of the day and it is difficult to keep them moist.

There are other specific requirements that seeds can have. Some require darkness to germinate (fennel, cilantro, nasturtium, calendula). Bury the seed well (but not too deep) to ensure darkness. We often cover these crops with black plastic until germination occurs, then remove as soon as the first seedlings emerge. Some need light to germinate (lettuce, dill) sow these on the surface and tamp in with a rake or mister, taking extra care in keeping the seed moist as it is more susceptible to drying out. The rest don’t seem to mind either way, constant moisture is all they require to germinate well and develop into healthy seedlings (our next topic).
The main goal of this column is to help get our community in touch with the movement of the seasons by observing nature (wild and in the garden), sharing seeding dates, information and experience as well as exploring the diverse 12 month harvest potential of our temperate climate. I hope to help you maximize your garden space and inspire you to play in the dirt, nurture plants, share and taste real food. It is time to plan your garden by calendaring your planting dates (dedicate a wall calendar to be your planting calendar) and mapping out your beds. Also, take inventory of your seeds and create a seed wish list. Sooke’s 1st Annual Seedy Saturday takes place at SEAPARC from 10-2 on Feb 27th. This will be a great place to get ready for the gardening season; there will be a seed swap, local seed vendors, gardening information and a lot of excited gardener folk buzzing around! Mary Alice Johnson will be teaching a basic Seed Propagation workshop at the event at 11:30-12:30 (register with SEAPARC) to help people get started.
Right now is also the time to divide perennials, prune and plant fruit trees, and side dress your garlic and raspberries. We are constantly watching the weather forecast and checking the fields at this time of year waiting for the beds to dry out enough to get on the tractor and spade without damaging the soil structure, so that we can prepare the soil for the earliest direct seeded and transplanted crops.
We can direct seed broad beans, peas and early potatoes as soon as we can work the soil.
Inside a cold frame we can direct seed spinach, kale, mustards, bok choi, radish, Japanese turnips, early carrots, chervil and cilantro (herbs), and many salad greens, such as: arugula, cresses, mizuna, claytonia, mache, and orach.
In trays on bottom heat (15 C) we can start lettuces to transplant.
Important seeding windows not to miss: Tomatoes and peppers should be started Feb-March on bottom heat. Celery and celeriac should be started Feb-March on bottom heat.
Leeks and onions should be started in trays Feb-March.

If you keep the top of the soil in seedlings constantly wet, you're likely to get dampening off, the common name for one of a number of fungi that thrive in moist conditions and kill your seedlings. Make sure you've got good air circulation and bottom water your seedlings allowing the top surface to remain dry. We're seeing little dampening off this year but I took a photo of the one plant I found with this ailment.

While Marika was transplanting lettuce, Jordan was weeding and mulching raspberries and direct seeding tatsoi, mizuna, and ruby streaks, Jess was thinning and weeding turnips, Ellen's mustard and cilantro, Kim and I were transplanting tomato seedlings into 4" pots.
